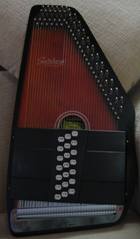
 This Christmas (2004) I spent converting my second autoharp (which I bought on eBay from a very nice man who'd had it for 25 or 30 years) to a G/D diatonic. The blue harp is chromatic and plays best in the keys of C, Bb, and F (which are good for quite a bit of the singing I do); it can also play in D and G, but it's weaker in those keys. Especially, the A7 chord has a lot of "dead wire" (strings blocked from sounding) in the bass end. I had it in mind when I got this autoharp to optimize it for D, G, and A, for playing tunes, especially with other people in the standard fiddle keys. (Plus, a couple of the things I do on the blue harp in C really ought to be in D for my voice; I've been pitching them lower for the sake of the harp's sound, which is not ideal.) I thought for a long time about how to tune it -- the simplest would of course have been to tune the whole thing up a whole tone and keep everything as it was otherwise, but that would have meant either putting an unacceptable amount of stress on the soundboard -- tuning 36 strings up a whole tone might well have broken the harp apart over time -- or sourcing an entire custom set of strings. I was halfway through this project when I found out about Eagle Music, which sells single strings at more modest prices than most UK outlets, and has the full range of gauges one would need to put together either a standard or custom set of autoharp strings. Too late! I was now committed. In the US, I can recommend Elderly Instruments in Michigan as a source for autoharp spares of all kinds; they sell a full set of autoharp strings for $55 (12/07), which is reasonable. I can also recommend the Harp Doctor for spare parts and reconditioned autoharps.
Anyway, one thing that interested me was the idea of diatonic tunings. The standard autoharp is chromatic, which means that it includes all the 12 notes in an octave (all the black and white keys on a piano). Diatonic harps sacrifice a few of those sharps and flats (black keys) in favor of doubling up the most important notes in a particular key. The overall effect is to make the autoharp sound more like a hammered dulcimer. The doubled strings create a fuller, more ringing sound, and for playing tunes as opposed to song accompaniments this has obvious advantages. You do lose some flexibility, of course, and there are some things which will simply not be playable on a diatonic. I would not choose it as my only autoharp unless all I intended to do was play traditional fiddle tunes.
Eventually, I decided upon the scheme described by Bob Lewis here (PDF), because it would optimize the autoharp for the keys of D and G, and A would work acceptably, and best of all it used a standard set of strings, so I wouldn't have to go hunting for custom jobs or commissioning them. I modifed Lewis's plan a bit, largely because he was working with a 15-bar harp and the one I have is 21-bar -- I had decided that a second harp should be the same make and model as the first, so that I would only have to worry about one set of spares and the parts would be interchangeable.
I made no changes to Lewis's tuning schedule.
I made a few changes to Lewis's chord selection. His scheme calls for two lockbars -- these literally lock out certain unwanted noted so you can play a chunk of the autoharp open -- which I didn't have and didn't know how to make (and didn't think I really cared about in any case). Adding those to the six extra I had (his layout is for a 15-bar harp), that gave me nine chord bars to assign any way I wanted. After some thought, I decided to add E, D, C, and G "modal" chords -- that is, chords lacking any thirds -- to give me some extra choices, as well as a G suspended 4th, a (very weak) C# minor, B7 (like the E7 this is a three-note chord), F#7, and A suspended 4. I have as of this writing (the day I finished the conversion) no idea what I will do with the suspended 4 chords, but the modal chords may be interesting (they won't let me play tunes using the missing third, but singing against them is likely to work very well). I have felt left over if I want to make changes (which of course I will document here if I do make them).
Changing the set of chords meant changing the layout somewhat. I may change this as I become more experienced playing this autoharp, but the below is my first stab at it. I focused mainly on placing the chords I knew I would be using in the most convenient center locations, and keeping them in the same relationship to each other they have on the blue harp. Because those relationships are the same, it's very easy to take a tune I've been playing on the blue harp in C and play it on this harp in D.
Here's the layout I've gone with:
| Gs4 | CMod | Ds4 | D7 | A7 | E7 | B7 | ||||||||
| GMod | C | G | D | A | EMod | As4 | ||||||||
| dm | am | em | bm | f#m | F#7 | c#m |
A supply of autoharp felt. You will have to get the right felt for your type of autoharp -- the 21-bar Oscar Schmidts, for example, use a smaller felt than the 15-bar Oscar Schmidts, and if you have a custom harp you'll probably have to go back to the person who made it to check what they used (though if you have a custom harp I'll be surprised if you're reading this or interested in doing a conversion because presumably you'll have commissioned the autoharp you really wanted).
The felt I used is the standard stuff for 21-bar OS autoharps. It came from Elderly in 10-inch strips, and not wanting to run out I ordered 21 strips. I had nine left over when I was finished. So figure converting a 21-bar harp (which, because you are going to retune most of the strings, will require you to refelt *all* the chord bars) needs approximately 12 feet of felt. If you don't like living dangerously, order a few extra feet.
A small flat or Phillips head screwdriver. Mostly, you'll need this to loosen the screws that hold the chord bar cover on. But I also find it useful to mudge the buttons into position when putting the cover back on.
If you haven't already lowered the action on your harp, moleskin/molefoam as noted on the first autoharp page.
A very sharp knife or razor blade (knife is easier to hold). I used a fairly new Swiss Army knife.
A wide steel ruler marked in (at least) quarter inches).
A Sharpie or equivalent.
A paper guide to what you are doing. This spreadsheet is the guide I used -- feel free to download and print out or alter to suit your tastes. The greyed cells are to be blocked off. The white ones with x's in them are to be left open. (Thanks to Paul Race for the 2024 updated version of the spreadsheet.)
Superglue. Do yourself a favor. Put a little dot of superglue under the bottom of each spring and stop losing them. And remember Murphy's Law of Folk Music #102: "Never take apart a concertina or an autoharp on a shag rug."
Electronic tuner. Expect to tune the autoharp every day for at least a week while the new tuning is settling in, particularly the doubled strings and the ones that are tuned up a whole tone. I think anyone who plays guitar should be able to tune it without electronic assistance, but autoharp is genuinely hard, especially diatonic ones, because of the tempering you have to do to make the same notes sound right as tonic, dominant, and third in different chords. I can tune an entire autoharp from scratch with just a single-note pitch pipe -- and I have, daily for two weeks when one was brand new and had never been tuned -- but this is a case where the gadget can genuinely save you a lot of time.
Measure to check that your autoharp is the same, but mine fortuitously had the strings spaced a quarter-inch apart. I therefore made a quarter-inch the height of the cells in the spreadsheet (which I then printed out to use as a guide), and aside from a little finagling at the spot where the autoharp switches from plain to wound strings, this worked extremely well. If your autoharp has differently spaced strings, adjust the spreadsheet cell heights to match.
Use the knife to cut the old felts off the bars (there were a few, though not many, where much of the felt was reusable), and to scrape off any residue of felt or glue. Then line the treble and bass ending marks up with the correct spreadsheet column, and use the Sharpie to mark where on the bars the felt needs to go to damp the unwanted strings. I found it most efficient to then place the bar on the harp and check how the markings lined up with the strings before applying the felt.
Now, cut your felts. For me, the simplest way to do this was to think in quarter-inch units. As I marked each bar, I wrote a little number above the mark to indicate how many units (cells on the spreadsheet, quarter-inches on the ruler) each needed. The felt strips are strips of felt with a strip of glue on the bottom plus a backing paper. I found it simplest to then place the felt strip on top of the steel ruler, and use the knife to cut through the felt and glue to create the set of blocks the chord bar called for -- eg, three fours, three threes, two twos, and four ones. You can then apply these to the chord bar following the markings you've made. You may need the knife to ease the felt strip away from the backing paper. Be careful about the glue strip, as it comes apart from the felt much more easily than the felt does from itself and sometimes than the glue does from the backing paper. It's not hard to ruin a felt. Probably professionals have some better way to do this than I explain here, but I did the whole autoharp accurately in an evening, which seems reasonable speed, and with very little wastage.
Check the chord bar again immediately after applying the felt, as that's going to be the easiest time to move the felt if you need to.
And that's pretty much it, except for putting the autoharp back together. You did, of course, put the screws in a safe location and you didn't lose any springs. Now, all you have to do is learn to play in this new configuration.
Wendy Grossman
Shiremanstown, PA
December 31, 2004
Back to folk music. Back to front. On to email.